
GUIDES: Selecting Your Equipment
Equipment for Your distillery

Now that we know how much of each spirit we need to make in the worst, average and best-case scenarios, it’s time to start looking for distillery equipment to meet our production volumes.
In order to ensure that all of the equipment gets evaluated and included in your budget as well as your floor plan, we prefer to write out how the booze will be made first for each product. Let’s take bourbon as our example and write out the entire production process for it

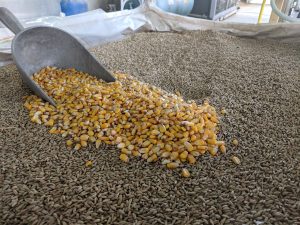
- Receive 650 pounds of whole kernel #2 dent corn, 400 pounds of whole rye, and 250 pounds of 6-row malted barley in 50-pound sacks on one combined pallet. Weigh out and mill 638 pounds of corn through the hammer mill at 1,250 pounds per hour, then place corn flour in storage hopper. Weigh out and mill 363 pounds of rye and 250 pounds of malt at 1,250 pounds per hour and store in a separate storage hopper from the corn.
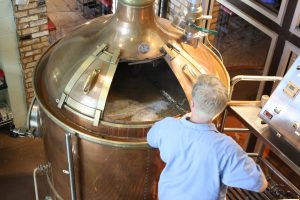
- The next morning, the mash/lauter tun will be filled with 255 gallons of water from the hot liquor tank, then the corn flour will be added while being agitated to prevent dough balls and heated with direct injected steam to 200°F and held there for 30 minutes. 113 gallons of 70°F water will be added to the tun to drop the temperature to 160°F, then the Malt and Rye flour will be added after the pH is adjusted to 5.5. The mash temperature will be maintained for 45 minutes before the temperature is reduced to 135°F by adding 123 gallons of 70°F water and the pH dropped to 5.3, which will be held for another 45 minutes. The mash/lauter tun will be drained through a wort chiller to drop the temperature to 70°F before pumping it to the fermenter. The first rinse water will also be pumped to the fermenter while the second and third rinse will be returned to the hot liquor tank, while the spend grain will be stored in 550-gallon totes until it can be shipped to a local farmer.
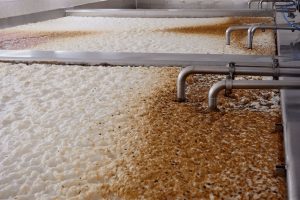
- The fermenter will contain about 500 gallons of wort. 0.75 kg of yeast will be rehydrated in 1.25 gallons of 104°F water in a ten-gallon stainless milk jug. The wort will be pulled from the fermenter and added to the rehydrated yeast three times to lower the temperature to pitch temperature, each time will be equal to the total volume of yeast (1, 2, & 4). After the temperatures are equalized, the rehydrated yeast will be pitched into the wort. Fermentation will take 6 days with the fermenter maintained at 75°F.
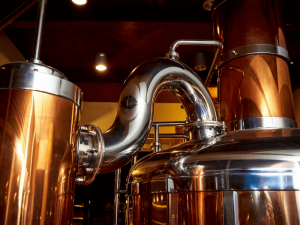
- After fermentation, the wort will be 10% ABV and it will be pumped to the 500-gallon stripping still. It will take 1 hour to heat up the still and then 6 hours to strip the wash with 150 gallons of 30% ABV low wines collected. 350 gallons of 1% ABV pot ale will be disposed of down the sewer. The low wines will be combines with the 50 gallons of tails (30% ABV) from the previous run and used to charge the 200-gallon finishing still. It will take 1 hour to heat up the finishing still and 6 hours to collect 1 gallons of heads (95% ABV), 60 gallons of Hearts (60% ABV) and 50 gallons of tails (30% ABV). 89 gallons of 10% ABV pot ale will be disposed of down the sewer. The heads will be used to clean the distillery while the hearts will be placed in a 200-liter new oak barrels with a #4 char. The barrel will need to be rehydrated with steam prior to the hearts being placed in the barrel. The bourbon will be matured for 4 years.
- A single barrel of bourbon will be pulled, once mature, at a time for bottling. The barrel will be emptied through a cheesecloth filter into a 75-gallon stainless steel tank. Over the next month, the proof will be dropped to 100 proof by the addition of one gallon of R/O water every other day. Once proofed down, the 63 gallons of bourbon will be filtered through a 1-micron filter prior to being sent to bottling. 317 bottles will be filled per batch.
By detailing out the distillation process (like example above), it starts making it easy to walk though both your inputs and outputs. *If you noticed that there are 7 gallons of bourbon hearts unaccounted for in there, great job!* In this example, we’ll need to account for what we do with that remainder over time: either buy an extra tank to store it in until we have enough to barrel or, in this case, dilute it to 20% ABV and store it in a 20-gallon barrel to use to dilute the barrel to bottle strength.
From the above process we can see everything we need: a way to move a 1,300 pound pallet with 26 sacks on it, storage for a pallet of grain, a hopper to dump the sacks into for the mill, a hammer mill capable of at least 1,250 pounds/hour, two storage hoppers (~150 gallons), an auger system to move the grain from the mill to the hoppers, a dump system from the hopper to the lauter tun, a 500-gallon lauter tun, a 500-gallon hot liquor tank, storage for chemicals to reduce pH, a wort chiller, a 550-gallon spent grain tote, at least one 500-gallon fermenter, 10-gallon stainless steel milk jug, dry yeast storage, wort pump, 500-gallon stripping still, 150-gallon low wines storage tank, high proof spirits pump, 200-gallon finishing still, 1-gallon heads receiver, 60-gallon hearts receiver, 50-gallon tails receiver, steam system for barrel, new barrel storage, maturation storage for 4 years of barrel production, 75-gallon proofing tank, R/O system, 1 micro filter system, bottler, labeler, and a heat gun.
Now that we’ve written down the entire distillation process from start to finish for our spirit—from the moment your ingredients arrive to bottling your spirit to be sold—you can look at the required equipment and begin to see what can be used in multiple parts of the distillation process for other spirits. For instance, you probably only need one wort pump and one high proof pump for all of your spirits.
One important note: Since each process is only written for a single batch of your spirit, it is important to look at how often you’ll need to make that spirit. If this process was used for our 50-seat distillery bar and bourbon was our only spirit, we would need to make a batch a little over once every two weeks. Of course, you’d need to make that booze 4 years in advance of your bar opening to allow for aging. For the distribution facility model, you need 26 batches per month, so plan on spending your weekends making bourbon too! This is a good point for iteration because there are 2 pitfalls that can happen here: if you’re running your still 24/7, you won’t have time to run the rest of your business, like finding and training qualified people, paying your taxes, building your brand, etc. But on the other hand, if you’re rarely running your still, you’ll have trouble meeting demand and will need to compensate by buying smaller, cheaper equipment.
Looking at the number of batches you need to run is only one part of production planning, the other part is your total system utilization. The easiest way to do this is using a simple table in Excel. Write out five weeks (by day) across the top of your table and major pieces of equipment down the side. Here is a shortened example using our bourbon process from above.

You can see that this distillery has the weekend off (awesome for them) and that, with 5 fermenters, they are at 100% total system utilization. In fact, they will be working pretty hard to mash, distill twice, kick off a fermentation, and clean everything each day. This represents roughly 10-12-hour days. If this distillery were to try and grow their production, they would need more equipment. A table like this should be generated for each production volume scenario that we created to determine how much equipment is needed initially and what space should be left for expansions.
Distillery Equipment Uses & Functions
Now that we have an inclusive list of the equipment we need and we know how many pieces of each we need in order to operate efficiently, it’s time to do two things simultaneously: start shopping for our equipment and plan out our production floor. Each piece of distillery equipment will have slightly different requirements for heating, cooling, electricity, and water. The better you understand the function and requirements of each piece of equipment, the better job you and your engineers can do in making sure that the building is built appropriately but not over-built. Then, we’ll need to lay out the equipment to make sure that we have enough space. If you do this before you get a building, you can get a good idea of how many square feet you need and in what configuration so you can find the right space that also meets the power, water, and gas requirements of your equipment. If you already have a building this is when you can take your current floor plan and see how things are going to fit, or if you will need to knock out some walls or get smaller equipment.
When you are shopping for your distillery equipment, each piece should be picked out based on how you’re going to use it. The more your equipment is tailored to you and your spirit, the better job it will perform. In a lot of cases, if you’re not trying to get a “multi-use” item that is capable of three jobs, it will also be less expensive. We’ll now walk through the major components of a distillery and talk about some of the features you may or may not want for your craft distillery.
Mills
The two main types of mills in the craft distilling industry are hammer mills and roller mills. There are some burr mills and cage mills floating around, but if you’re shopping for one of them, you probably already know why. Roller mills are popular in the brewing industry because they do a good job of separating the husk from the malt and tend to leave a larger grist size that works well for the lauter tun (most common in the industry). Because roller mills are so common and a lot of people come to the distilling industry from the brewing industry, they are pretty common on this side of the industry as well. Typically, brewers are using two-roller mills. But is a two-roller mill right for you? If you are looking to mainly do malt and malt-like products (mainly wheat since rye is a lot smaller) or if you are doing off-grain fermentation, then the two-roller roller mill will do the job nicely for you. There are also 4- and 6-roller roller mills. These are capable of giving a finer grind than a 2-roller roller mill, or are at least doing it much quicker since you can decrease the spacing between the rollers as you go (rather than expecting a single set of rollers to do all of the work). Generally, roller mills are more expensive than hammer mills, mill slower, and require more maintenance. But they have life spans that are 4 times longer than a hammer mill and can separate out the in-fermentable husk.
Hammer mills are mainly used in the grain business and are used for making flours. Hammer mills can mill a lot of grain quickly and can make a much finer grist than is possible in a roller mill. The benefit of a finer grist is that it takes less time for the water, heat, and enzymes to act on the grain particle, which means mashing times decrease and yields increase. But finer grist will also pack tighter, increasing lautering times and even blocking off the screens. Hammer mills are also required to work with potatoes and corn, so if you’re looking to branch out with your mill, you will be better off with a hammer mill. The fine grist from a hammer mill works best with on-grain fermentations or when using a mash filter.
Mash Tun
A mash tun is where you will be performing the conversion of starch to sugar, so it’s not needed for sugar-based spirits. Though, with most of them, a little bit of heat (less than 135°F) can help with the sugar absorbing into the water. People that have a mash tun available have been know to use it to heat the water and mix in the sugar, agave, honey, molasses, or whatever else they desire.
There are a couple of things to look for when you are converting starch to sugar: the first is what your heating mechanism is. Direct electric heat is really only useful for small kettles and generally not recommended once you get over 100 gallons. Direct steam injection, on the other hand, is the most energy efficiency mechanism. But, you will need steam that is not treated with chemicals that could hurt your mash or fermentation. And you need to account for the volume of water from the steam in calculating your water volumes. Another heating mechanism is indirect steam. It’s less efficient but allows for the use of cheaper steam. Cheaper steam is important because most plants can’t afford multiple steam systems and you will likely be using that more expensive steam in other places as well. Depending on the indirect method you use—coils or steam jacket—there will also be issues with cleaning and agitation.
Speaking of agitation, there are a couple of different methods you can deploy. The simplest method of agitation is a good ol’ paddle. This typically requires an open-top mash tun that is fairly small so you can reach across the mash tun and touch the bottom. Once you get to 500 gallons or more, you’ll need mechanical agitation in order to access all of the tun and keep things moving. Once you add agitation, a common option is a high shear mixer that will not only break up dough balls that form but can also break up any grain particles that they encounter, helping to decrease grist size in the tun. Of course, a high shear mixer doesn’t help a lot in a lauter tun or if you’re trying to keep your particle size up. The other type of agitation that is useful in lauter tuns specifically are grain rakes and a bottom scraper (to help clean the screen if there is a plug). These tools are mainly only options on lauter tuns, though some combo tuns will still have them when the screen is removed.
We’ve talked about lauter tuns a lot and now is a good time to explain exactly what it is. In its simplest form, it is a screen in the mash tun approximately 6-12 inches above the bottom that keeps a liquid layer below the screen. The idea is that a grain bed will build up on the screen after the majority of starch has been converted to sugar and once the mashing is done. The wort filters through this grain bed, absorbing any sugars that remain attached to the grain particle. Additional water is added and filtered through this bed until all of the sugar is removed from the grain. Some of this water is sent to the fermenter and the amounts with lesser sugars will be reused as the water to start the next mashing. If you are lautering, you will not be able to ferment or distill on the grain.
Fermenter(s)
Fermenters are probably the most overlooked piece of equipment in a distillery because most of the time, when they are working properly, you just ignore them in the corner. They simply do their thing and all you do is fill and empty them when you need to. This unfortunately leads to a large number of distilleries that are fermenting in plastic totes or 55-gallon drums. Although, to be fair, if that’s what you’re intending to do with your spirit, it can work.
The simplest thing a fermenter needs to do is contain the liquid of your wash, wort, or mash while letting the CO2 come out of solution. The easiest way to do this is with open top fermentation and with a vessel that is about 20% larger than your fermentation. This will keep your foam in the fermenter and easily allow the CO2 to get out. Some people object to open fermentation due to the risk of critters and microbes getting into your fermentation and contaminating it, so they add a bug screen or a solid top. If the solid top is added, then typically an airlock is used (a hose into a bucket or a home brew bubbler are the most common) to allow the CO2 to escape. For smaller fermentation, fermentation types that are not temperature sensitive, or rooms that are kept slightly below the desired fermentation temperature, this is typically enough of a fermenter.
Temperature control is typically the first complexity that people like to add to their fermenter. The reason for this is twofold: one is that various yeast strains act differently at different temperatures and the other is consistency. If you want to put extra banana flavor in your rum, you can run your fermentation a little hotter, or if you want to make a rye vodka, then a colder fermentation can help mitigate some of the rye spiciness. When it comes to consistency, if your distillery is 90℉ in the summer and 60℉ in the winter, your fermentations will behave differently depending on the time of the year—both in taking different amounts of time and putting out different flavors. This can be turned into a marketing benefit or you can make different spirits in the winter than in the summer. But for those of you who want to make the same spirit year-round, temperature control on your fermenters is the easiest way.
Most of the yeast used in the distilling industry will rise to the top of the fermenter when they are most active, which then tends to make the top of the fermenter hotter than the bottom. In order to keep the temperature consistent throughout the fermenter, the cooling jacket is broken up into multiple zones with multiple sensors. As that zone gets out of range, it is cooled independently; basically, the top of the fermenter will be cooled more than the bottom. Sometimes an additional zone will be placed in the cone (if you have one), and this zone is kept particularly cold so that yeast that settles down to the bottom at the end of their activity cycle will shut down and not produce off flavors.
Speaking of cones at the bottom of fermenters, that is one of the most common questions: “Do I need a conical bottom or a flat bottom?” And, as with everything else, the answer depends on what you are going to be making. The purpose of the conical bottom is to give solids (dead yeast, molasses solids, or grain solids) a place to settle out so you can minimize the liquid volume they occupy and rack the fermented wash off the top and then clean out the junk. If you are not going to be fermenting solids, except for dead yeast, they really don’t service a purpose because the dead yeast won’t hurt your still or distillation process. Also, if you’re not going to separate the solids from the liquids in your fermenter (either because you’re going to distill on the grain or you’re using a mash separator after your fermenter), then they have no real purpose. Beer is generally done once it comes out of the fermenter so they try to separate out the yeast at that point, but the still works well to separate solids from liquid (actually vapor). So, as long as your solids won’t put off weird flavors when they heat up, you’re ok. Where we see conical bottoms most commonly used is people from the beer world who are doing what they know; people fermenting on the fruit and racking off, also people fermenting on the grain and racking off. It is common for the last two types to clog the conical bottom and have trouble getting the solids out through that two inch opening. In most cases for distilling, a flat bottom (actually slightly sloped) is what you are looking for.
Still(s)
There are a couple of ways to look at stills by how they operate. First off is the question between continuous and batch operation. In continuous operation, the wash or beer is fed into the still continuously while pot ale, hearts and heads come off the other side (there are a couple of different ways for the out products to come off but that’s the most common). Batch operation is the most common in the craft distilling industry because we typically aren’t operating 24 hours a day or even the 16 hours a day where the continuous still becomes more efficient. In batch operations, the still is charged with wash or low wines, or a neutral charge, and then distilled until it is finished. Heads come off the still first, followed by hearts and then tails (again there are some other splits used but this one is pretty common). Once the charge is finished, the still is emptied and then refilled before the next batch begins.
The other way to look at still operation is how it creates reflux—which is what creates the separation between ethanol and water (as well as all of the other chemicals in there). In the simplest case, the wash is heated until the most volatile components are volatilized and then these components are condensed back into liquid in a single step. This operation isn’t really done in modern stills and is practically only seen in those old alchemy set ups with an alembic still. Even in pot stills, there is reflux performed in the head of the still as the vapors expand, cooling down, and the least volatile components turning back into liquid and running down into the pot where they interact with the rising hot vapor. Also, heat is lost through the copper in the head, which contributes to the reflux. Lastly, the height of the head can cause reflux and is one reason for the height of the swan necks in Scotch stills.
While pot stills create ‘natural’ reflux by removing heat from the volatile vapors, other stills cause active reflux. The most common of these professionally is in plated stills, where either a perforated plate or a plate with bubble caps allows for the rising vapor to pass through a liquid leg. In that liquid, heat is exchanged between the vapor and the liquid, causing the vapor to collapse to a liquid and the most volatile components in the liquid leg to volatilize. Basically, this action forces the single distillation above to happen again and again on each plate. There are a couple of other mechanism going on in a plated still but that is the major one. An alternative design to a plated still is a packed column. These are traditionally used either in really large stills (think cracking towers for making gasoline) or the tiniest home rigs. There are some professionals that have upsized their home rigs and some of the less expensive professional stills use them too. By packing the column, you give the rising vapors places to condense and run back down the column to interact with the vapor. Rather than have set plates where this occurs, the interaction occurs throughout the column. There are ways to calculate how many theoretical plates that a packed still has to ensure that you get the separation that you are looking for.
The other type of active reflux involves cooling the top of the still. Historically, this was done with external plates where ice or cold water could be placed. In modern stills, it is done by circulating cold water through a coil or jacket at the top of the still. The nice thing about this design is that the amount of forced reflux can be changed over the course of the distillation and, in some designs, all of the heat can be removed from the vapor, effectively stopping distillation from happening. By controlling your reflux, you can dial a still up to create vodka or have no reflux to make it a pot still. You also have to match the heat input to the cold input in order to use these systems effectively, so they do take a little more experience to run effectively.
When selecting your still, the most important thing to think about is what spirit you want to make. If you are creating a lot of funk in your fermenter using high fermentation temperatures and lots of dunder, then you don’t want that all to be stripped from your spirit by your still, so choosing a design with a high amount of reflux isn’t desirable. On the other hand, sometimes a still with enough reflux that you can jump from your 10% beer to a 60% barrel on a single pass will bring along more flavor than a double-distilled spirit.
There are many different distilling system and generally our advice is to select one that you know makes the kind of spirit you like. If your primary goal is to make American single malt in an Islay style, then we would point you towards a scotch still and make sure you know that your bourbon is going to carry a bit more funk than would be common on a 4 plate American whiskey still. We’ll also remind you that your bourbon being different isn’t a bad thing.
Packaging Equipment
Once you have your finished spirit, you’ll need to prepare it for the market. While assembly lines are still commonly used, exploring ways to automate the bottling process will increase your efficiency.
There are many good manufacturers, but CRU bottling systems may be a good place to start your search.